Tag Archives: recipes

Hungry for Hugarian…

18 Jan

Time really flies. Christmas came and went, and were already two weeks into the new year. Life took me on its usual roller coaster and things are finally a bit brighter for me. New year, new me. Everyone says it… but I’m really working on it. I’ve got this new “glass half full” attitude, I’m bitching less, meditating more, and letting things go. And…. I feel great. But enough about me, let’s get in a new recipe for you guys.

Food blogging is not as easy as I imagined. You make mistakes (wait till I blog about my pesto disaster), and practice makes perfect, which means I have to actually make the recipe more than once. Because if there’s one thing you should know about me is that I am not perfect, nor what I do is always perfect, but I sure as hell try.

Anyhow, I have successfully made the following recipe more than 5 times. LOL. It is absolutely delicious. The first time I made it I was so excited that I nearly chopped my finger off while cutting the onion. The second time, I forgot the sour cream. But now I got it down to the tee. With that said, I really do hope you like the recipe, one that is sure to keep your house full at dinnertime.

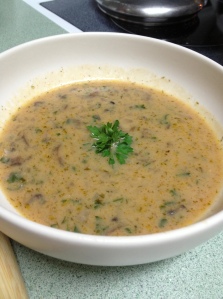
 Creamy, cheesy, mushroom soup 🙂 

What you’ll need:

  • Butter (4 – 5 tablespoons)
  • One white or yellow onion, chopped (makes about 2 cups)
  • One pound of baby portabella mushrooms, washed and sliced
  • Dry dill weed
  • Paprika
  • Soy Sauce
  • Two cups of chicken broth
  • One cup of milk
  • All-purpose flour
  • Salt
  • Pepper
  • Lemon juice
  • Fresh Parsley (finely chopped)
  • Sour cream
  • Shredded mozzarella cheese

*A few side notes: Instead of slaving over an onion, crying like a fool, do yourself a favor and buy the onion chopped.  Two 8-ounce packages make a full onion. Trust me, I almost lost my thumb while chopping up the onion! While you’re at it, buy the mushroom sliced. It’ll cut your cooking time immensely. Use a large pot! My first pot overflowed by accident. Lol. -_-

Directions:

  1. In a large pot, set your stove to medium-high, and melt 4 tablespoons of butter. Once butter has melted, add the chopped onions and sauté for 5-10 minutes.
  2. Next, add the sliced mushrooms. Sauté for another 5-10 minutes.
  3. Now add 2 cups of chicken broth, 2 teaspoons of dried dill weed, 1 tablespoon of paprika (a little less, if you’re not a fan of spice), and 1 tablespoon of soy sauce.
  4. Let it simmer one medium-low for about 15 minutes.
  5. In the meantime, using a separate bowl, dissolve 3 tablespoons of flour with a cup of milk. After the 15 minutes are up, pour in this mixture, making sure the flour has fully dissolved and stir well to blend. Let it sit on low heat for another 15 minutes. Stir the soup occasionally.
  6. Next, add 1 teaspoon of salt, the chopped parsley, 2 teaspoons of lemon juice, and black pepper to taste. Half of a teaspoon should be good enough.
  7. Mix well and let it sit on low to simmer for about 5 minutes.
  8. The cheese is the finally touch. Once served in a bowl sprinkle the shredded mozzarella cheese on top. I love cheese (something most of my followers must know by now) so granted, me saying sprinkle really means almost a handful. Lol. So add the cheese as your so desires.  And you can use a parsley leave to set in the middle for decoration.
  9. Serve the soup with a side of toasted French bread, cheese bread, crackers, or by itself. The soup itself is delicious, so anything else is really an add-on.

10. ENJOY ! ❤


photo

photo 2

photo 3 ( I LOVE WINE… with everything 🙂 )

Easy, peazy, Italian Pasta Salad

19 Jul

Inspired by a picture of what certainly looked like a delicious  meal that my best friends new Italian friend made for her, comes my delicious cold Italian pasta.  That and the fact that my grandma is slacking in the kitchen. I’m tired of eating the same old crap everyday. LOL. At least I know that the day I get married, I’ll have the potential of making my husband happy. He’ll get to eat good meals every day, and never the same meal. I love cooking. And I love getting creative too. It makes my tummy happy 🙂

What you’ll need:

For the PASTA

  • 1 cup of uncooked rotini  pasta
  • 1 can (14oz) of artichoke hearts, drained and cut into small pieces (or shredded, lol, not that I did that intentionally. it just happened!)
  • 1/2 a cup of red bell pepper
  • 1/2 a cup of green bell pepper
  • 1 cup of provolone cheese (I got 4 or 5 slices of provolone & chopped them… and then added another slice or two)
  • 1 carrot cut into strips or chopped up into small pieces
  • 1/4 cup of red onion, chopped. (I didn’t really measure this either!!)
  • 1/4 lb of genoa salami, chopped into small pieces (or shredded if you don’t have much patience either)***
  • A pack of crackers

*** I didn’t weigh out a 1/4 of a lb of salami. Really?!?! Just grab a few slices until you think its enough. Simple. 🙂

For the DRESSING

  • 1/3 cup of extra virgin olive oil
  • 2 tablespoons of red wine vinegar (or apple cider vinegar)
  • 1/2 teaspoon of salt
  • 1/4 teaspoon of ground black pepper
  • 1/2 teaspoon of sugar
  • 1/2 teaspoon of dry mustard
  • 3 or 4 tablespoons of basil, finely chopped

Directions :

  1. In a large mixing bowl combine all of the ingredients for the pasta.
  2. In a separate small bowl, combine all the ingredients for the dressing and mix well.
  3. Pour the dressing over the pasta and refrigerate for at least 2 hours or overnight. (hint: the longer the better)
  4. Serve with a few crackers and a nice cold glass of freshly squeezed lemonade.
  5. Finito! You have a yumy summery dish! And it was super easy ! 🙂

Banana Nut Pancakes

26 Jun

Here’s the thing about me and pancakes: I simply don’t like them, lol. But, as the old saying goes, never say never.

A few months ago I went on a trip to Georgia with a few friends and of course, pancakes ended up being on the breakfast menu. Although I was a bit hesitant, I didn’t say anything just because I didn’t want to be rude. And boy was I glad I didn’t. Those pancakes were the best pancakes I had ever tried. And so, I now only eat Banana Nut pancakes. Lol. 🙂

I’ve made them quite a few times since my return from Georgia. However, I hadn’t posted the recipe because I had yet to learn how to flip pancakes. Lol! But now that I can successfully flip 3 out of 5 pancakes, I will share the recipe.

Here’s what you’ll need:


1 cup of milk
1 egg, slightly beaten
1 tablespoon of cooking oil
1 cup of pancake mix (this part is tricky) **
1 – 2 ripe bananas (so is this one, lol) **
Butter
1/4 cup of pecans, finely chopped
Maple syrup

** I will not lie. These are the parts I have yet to master. In my house it’s only 2 of us & the problem is that the box recipe for pancakes yields 15-18 pancakes. Lol. The first time I followed the recipe I ended up eating pancakes for 3 days. So like everything else I have done in my kitchen (or my life for that matter), I had to make a few changes. 🙂

Now for the fun part… Here’s how it’s done:

  1. Mix the egg, the milk and the pancake mix in a large bowl. Stir until well blended and smooth.
  2. Mix in the chopped pecans.
  3. Slice the bananas into small rounds, not too thick, but not to thin.
  4. Grease a small pan with butter and place over stove to heat.
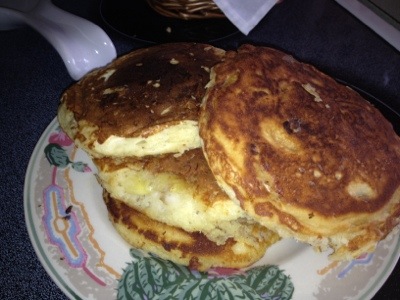
  5. Take 3 or 4 of the round slices of banana and place them in the frying pan, creating a small circle, then pour the batter over the bananas. If you have a soup serving spoon, it will be easier. You fill half of the spoon and that should be enough to make a fluffy pancake.
  6. Cook the pancake until it bubbles at the top. While it cooks, I use a spatula, and poke at the sides of the pan to make sure the pancake doesn’t stick and it’s easier to flip later. (It also gives me time to figure out which side will be easier to flip, LOL)
  7. Once it starts to bubble, slide the spatula under the pancake and quickly flip. Cook that side for a minute or two, or until both sides are a golden brown.
  8. In a small serving cup or bowl, heat the syrup in the microwave for about 30-45 seconds.
  9. Serve pancakes with a small side of butter, the warm syrup and a tall glass of delicious OJ.
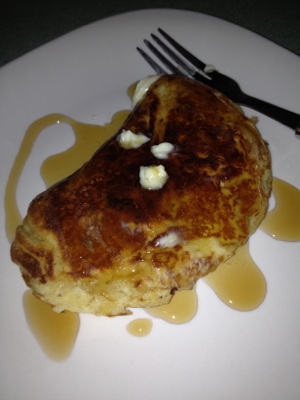
  10. The end! Don’t forget to enjoy every bite, and say “hmm hmm, goooood!” LOL 🙂 !


Voila ! The best pancakes you’ll ever have 🙂

20120625-004554.jpg

20120625-004642.jpg

The American Woman Cheesecake

4 May
You’re probably wondering why I named it “American Woman”. Well, the story behind this cheesecake is pretty simple: My co-worker, otherwise known as “mama bear” in my previous posts, is becoming a U.S. Citizen!
Of course, Cris and I couldn’t let this day pass without doing something special for a very special woman. So we decided to have a mini celebration at work. That’s when Cris came up with the brilliant idea of playing the song “american woman” while we surprised mama bear. So, alas, I named the cake after her. 🙂
 
This cheesecake, is simple, easy to do, and absolutely DELICIOUS. What’s best is that you can change the decoration as much as you’d like because the cheesecake itself is a simple version of the new york style cheesecake. The only down side is that the measurements for the actually filling of the cheesecake, make the cheesecake rather small. SO, as soon as I alter the measurements and improve the cheesecake, I will post it up.
 
In the meantime, here’s what you’ll need.
 
For the crust
– 1 1/2 cup of graham-cracker crumbs
– about 9 tablespoons of butter, melted
– 2 tablespoons of sugar
 
For the filling
– 16 ounces of light cream cheese (in all honesty, I wasn’t digging the “light” part, so I added one 8oz of light and one 8oz of regular ;P)
– 1/2 cup of sugar
– 2 large eggs
– 2 teaspoons of vanilla extract
-3/4 cup of strawberry jam (seedless!)
– 1 pint of blueberries
 
Directions:
1. Preheat oven to around 340 – 350 degrees F.
2. Grease a 9in baking pan.
3. In a small bowl, stir the grahamn-cracker crumbs, butter, and sugar until well blended. Then, using  FLAT spatula (like the silicone ones), press the mixture onto the bottom of the pan.
4. Bake the crust for about 10-12mins and make sure to let it cool off completely! (very important, if not it will crack)
5. Place the cream cheese on a small plate; microwave for about 30seconds to soften it.
6. Then beat the cream cheese in a large bowl until smooth. Slowly beat in the sugar, vanilla, and eggs. Mix until well blended.
7. Pour the filling over the crust. Bake for about 40 to 45mins.
8. Cool completely, mine took about an hour or so. Then place it in the fridge until you’re ready to serve.
 
Decoration 🙂 :
1. Place the jam in a small saucepan and cook over low heat, stirring it until it dissolves. Let it cool slightly. Not too much because then it solidifies.
2. Pour the jam into a small ziplock bag and seal it.
3. With the cheesecake cold, cut it into small squares; should be about 10 slices.  
4. Cut out a *very small* hole in one of the corners of the ziplock bag, so that you can make the lines of the flag.
5. To decorate, place a few berries on the top left corner of each bar and then pipe out the jam in stripes, around the berries to create the flaglike effect.
 
And voila… you have the American Woman cheesecake. 🙂 Enjoy !


P.s. Here are some pictures of our mini celebration at work. Love you mama bear! ❤


Che Guava

31 Jan

Che Guava is an icon, hero, and leader of the fruity revolution.

LOL. Usually, I like to write a story about how I came about the recipe or what happened as I made the recipe and all this other good stuff. But, considering that I came about this recipe while on a trip to Georgia that brings back not so great memories, I figure…. I’ll just go in with a crappy joke. LOL.

My co-workers got to be the guinea pigs and from all the “ohhs and ahhs” I got, I take it was delicious. This is an edited version of what I learned in Georgia, as is every recipe I post, but the only thing added were eggs and a topping. I added eggs because I wasn’t paying attention when she made the pie without the eggs and a topping because I felt that without a topping, it was kinda nakey, lol.

🙂

What you’ll need:

  • 2 Packages of Cream cheese
  • 1/2 of guava paste, cut into small chunks (1/2 cup is roughly half of a 17oz square of guava paste. I added a little more than half because I wanted to give it a pinkish color and half just wasnt enough. That and the fact that I love guava, lol)
  • 1/4 cup of sugar
  • 1/2 teaspoon of vanilla
  • 2 eggs
  • 1 graham crust
  • Whipped topping
  • Guava marmalade

Directions:

  1. Preheat oven, 320°- 350° F.
  2. Soften the cream cheese and guava paste (separately!!) in the microwave, about 15seconds.
  3. Beat the cream cheese, guava paste, sugar, and vanilla in a large bowl, until well blended.
  4. Add the eggs and mix until it’s all well blended.
  5. Pour it into the crust and bake for about 40mins. Remember that all ovens don’t work the same so make sure you check on it every so often. Use a knife to check the center of the cake. If it comes out relatively dry, you can pull it out of the oven. Otherwise, you’re gonna get one crispy pie.
  6. Let the cheesecake cool, for about 30-45mins and then refrigerate for 3 hours or overnight.
  7. Top with the topping of your choice. I prefer whipped topping and some marmalade. Make a pretty swirl, a happy face, whatever tickles your pickle.
  8. Enjoy!!
BEFORE:

AFTER:

Extra cheesy but so delicious Mexican Dip

23 Jan

Have I ever mentioned how much I love cheese? Well, I do, I do, I do-ooooooo. When I came across this recipe, I was unsure about it, simply because I needed something simple and easy to do all the while being extra delicious, for my friend’s New Year’s Eve/Birthday party. I will admit that when I started to follow the recipe… I decided to make a few changes. Then halfway through the process I was regretting it because I was afraid that no one would like it. Luckily for me, “like” was an understatement. 🙂 But, please keep in mind that when you’re making a new recipe never, ever, change the recipe the day you’re supposed to present it to a bunch of strangers. This will only make you feel queezy up until you realize whether it was a total success or an epic fail. And if it’s an epic fail, run for the nearest exit and don’t look back. Chances are they’ll never find out who brought it through the door anyway.

What you’ll need:  

  • A small 9 inch rectangular aluminum pan, of some sort (make sure it’s something you can stick in the oven)
  • Cream cheese (I used an 8oz bar and half of another one)
  • Mexican Style Four Cheese (I used a pack and I took some from another pack. Like I said, I love cheese.)
  • Thick and Chunky Salsa
  • Cilantro leaves, finely chopped
  • Red, Yellow, and Orange Sweet Peppers
  • Jalapeno peppers (I didn’t add it, because I wasn’t too sure how tolerant people were when it came to spicy… but let’s just make pretend I did)
  • Half of a Lime
  • Sour Cream
  • Tostitos Lime Chips
 
Directions:
 
  1. Soften the cream cheese in the microwave. About 30 secs or so.
  2. Mix the cream cheese with 1 cup of shredded cheese (which is pretty much half the bag) and some chopped up cilantro.
  3. Spread the mix onto the bottom of the pan.
  4. Pour in half a cup of the chunky salsa. Top with 1/2 of cheese.
  5. Repeat step 4 to create another layer… YUM.
  6. Bake at 350degrees for about 25mins or until the dip is heated through and the cheese is melted. ** Sidenote:  I’m a firm believer in slow cooking, because a. I’m still a newbie and b. good things come to those who wait, even when it comes to food.
  7. While in the oven, chop up some cilantro leaves and the sweet peppers. I used one red, one orange, and one yellow because… I thought they were pretty. 🙂 **Slice them however you’d like. In strips or like I did, in full circles. They’re for decoration (and eating later!) so the prettier the better.
  8. If you know the likings of your guests then you can definitely use jalapeños. If you don’t know whether or not you will send someone to the hospital because of allergies… then I suggest you don’t. But, the jalapeños touch is phenomenal.
  9. Remove from the oven and top with the remaining ingredients in layers (whatever looks prettiest): cilantro, sweet peppers, jalapeños and some more cheese, LOL. Squeeze on the lime juice and throw it in the oven for another 10mins at a low temp, say 300degrees, just so that the cheese melts on top.
  10. On a side dish, place the tostitos chips and the sour cream.

You’re now ready to enjoy the cheesiest mexican dip you have ever had. Just thinking about it makes my mouth water. Yummmmy.

 Enjoy ! 🙂

Peppa, Peppadews!

1 Jan

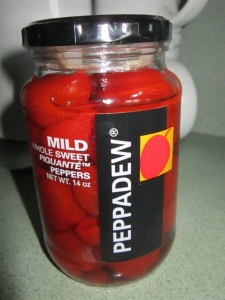
On a recent trip to California, “mama bear” discovered a delicious appetizer: Stuffed Peppadews. However,  once in Florida we quickly discovered that you can’t get Peppadews in a regular market. Nope. You gotta find your nearest Produce Market (which ain’t that near) and call to make sure they even carry peppadews because not all of them do. Of course, curious old me decided to do her research on these delicious sweet little peppers and here’s what I found:

Peppadews were discovered  only 15 years ago in South Africa. The closest Vineyard is in New Jersey. It is illegal to plant peppadews without the consent of the person who discovered them. LOL. All in all, we have fine taste. So that you can do some reading of your own:

http://www.peppadewfresh.com/peppadewstory.htm

There’s also a list of recipes that include peppadews which without a doubt I will try to do. But for now, I will introduce Stuffed Peppadews with Goat cheese and Salami.

What you’ll need:

A jar of Peppadews

Genoa Salami

Goat Cheese**

** Make sure you buy the bar goat cheese and not the crumbled cheese.

Directions:

  1. Remove the needed peppadews from the jar and drain the liquid from the inside.
  2. Remove the seeds.
  3. On a seperate plate, lay out the salami slices.
  4. Cut out small chunks of cheese and place it in the center of the salami.
  5. Delicately, roll up the salami so that the goat cheese is held in the center.
  6. “Stuff” the peppadew with the rolled up salami.
  7. Place it on a nice serving platter and serve as an appetizer.
  8. Don’t forget the wine. Oh my god. Heaven in your mouth with wine. 🙂

*Warning: Peppadews are a bit spicy. So if you don’t like spicy food… you’re stuck like chuck because you’re missing out on the most delicious appetizer you’ll ever have. 🙂

Step by Step Pictures:

Lemon Pepper Chicken

28 Dec

Life can get a little hectic. Although I haven’t stopped cooking, I haven’t really had a chance to blog my recipes. However, I must admit that my cooking rendezvous have diminished with  grams at home. The lady doesn’t let me into her kitchen. What can I say ?!

The following recipe is an oldie of mine. I altered the recipe just because, I felt like it.  I’ve made it a few times and I had the “recipe” (although I already know it by heart of how easy it is) written in my cheap mini journal, so I figured it was time to include it into my upgraded recipe book. Here we go!

What you’ll need:

  • Chicken breast (Don’t ask me how many because you know what my answer is. & if you don’t… read my previous posts 🙂 )
  • Lemons or Limes (The original recipe uses Lemon, I use Lime.. because that’s usually what I have in my fridge at the time of making it)
  • Garlic cloves, finely chopped
  • Olive oil
  • Salt & Pepper
  • Thyme powder (or leaves)
  • Optional: Lemon pepper seasoning

***Please don’t kill the recipe by using “lemon juice”. It tastes like crap. Work your hands and do some squeezing. 🙂

Directions:

  1. If you plan on doing this recipe, it would be a good idea if you prepare it the day before or that same morning. It just tastes better when the chicken has been sitting in the seasoning for some time.
  2. Cut up the chicken breast however you’d like. Cut them into little squares or cut them in halves.
  3. Place the chicken in a small bowl. Squeeze the lemon juice over the chicken, throw in the garlic, and add a teaspoon or two of olive oil (you can use 2 or 3 lemons if you’re making 2-4 chicken breasts and 2 teaspoons of olive oil)
  4. Add salt and pepper to taste.
  5. SPRINKLE the thyme over each breast. Thyme has a really strong taste, so don’t overdo it.
  6. You may use a little lemon pepper seasoning if you want. I like to put a little at the end.
  7. Cover the bowl with Saran wrap and place it in the fridge for at least 30mins. Preferably overnight.
  8. Cook the chicken in either a skillet or grill. I’ve always done it on a skillet, put I can only imagine how delicious it must taste when grilled.
  9. Serve with: white rice, mashed potatoes, veggies, a salad, whatever tickles your pickle.
  10. Enjoy!


Bruschetta’s for Thanksgiving.

29 Nov


If there is one “menu” I’d say that I enjoy the most, it would have to be Italian. Again… a recipe inspired by Mama Bear, I decided to learn how to make appetizers. And what better than yummy Bruschetta’s?! This was one the few dishes I made for Thanksgiving this year, of which my guinea-pigs were all thankful for.

Easy-peazy appetizer that should be suffice for about 6 or 7 people. Yield’s about 24 small slices. … here’s the recipe.

What you’ll need: 

  • 7 Ripe plum tomatoes***
  • 2-3 Garlic cloves,chopped
  • 1 Tbsp. of Extra Virgin Olive Oil
  • 1 teaspoon of red wine vinegar (you could also use balsamic, whatever floats your boat)
  • handful of Basil leaves, about 6 or 8, finely chopped
  • A loaf of Italian bread… or French bread. They’re both pretty good. Please, please, please, not Cuban bread.
  • 1/4 cup of Olive oil
  • Salt & pepper to taste
*** Make sure you get Plum tomatoes and nothing else. The plum tomatoes are small and elongated. Cherry Tomatoes are small and round (like a cherry, duh) and god forbid you use salad tomatoes. Anyway, Plum tomatoes are less juicy and have more meat. They also have less seeds, which will be helpful when seeding. You’ll understand why in a bit.

Directions: 

  1. Start with the tomatoes. “Parboil” the tomatoes in boiling water for on minute. All these fancy smancy directions drive me nuts… here’s what this means: Boil the water and then remove the pan from the stove. Drop the tomatoes in and let them boil for a minute. Don’t go over the minute, or you’ll be throwing salsa on your bread. lol.
  2. Remove the tomatoes from the boiling water and peel off the outer skin. I found that some of them popped on one side so I used that side to continue peeling. If it doesn’t pop, using a sharp knife make a small incision on one side and then peel. Not too deep, remember you’re peeling the outer layer.
  3. Once peeled, cut them in quarters and remove the seeds from the inside.
  4. Chop, chop, chop away at the tomatoes. Slice’em and dice’em & put them in a medium size bowl.
  5. In the meantime, warm up your oven. Cut up your loaf of bread , diagonally and not too thick (about a 1/2 inch.) , into about 20 – 24 small pieces.
  6. Using a brush and  the 1/4 cup of olive oil, brush the oil onto one side of the bread slices. Place them oil side down on a baking sheet, pan, or whatever you stick in your oven and bake at 450 degrees for about 5-6mins, or until the bread begins to golden.
  7. While the bread is in the oven, toss in the chopped up garlic, the tablespoon of Olive Oil, the teaspoon of vinegar, the basil and the salt and pepper into the bowl of tomatoes.
  8. Mix well, but not too much because the tomatoes will lose their shape.
  9. Remove the bread from the oven and place them neatly on a serving dish, olive oil side up.
  10. NEATLY, spoon the tomato and basil topping over each slice of bread.
Finito ! 🙂 

Buon Appetito

Ensalada a la Barbara

23 Sep

A few months back my co-worker, Barbara, moved into my branch from Ft. Lauderdale. Barbara is a tall, Argentinian, wild yet with her two feet on the ground, amazingly stunning, hot mess. LOL. She’s also my “life mentor”, “the love doctor”, and “mama bear”. And in between  all that, a true inspiration. 🙂

Barb’s has taught me plenty in the few months that she’s been my desk buddy. And one of the many things she’s taught me is… You can’t say no until you try it. For a person who “loves” food, I can’t say that I eat much of anything that isn’t ordinary.

Mama bear likes to feed people. It’s her thing and she’ll never take no for an answer. And this is what she’s done with me. To the point where sometimes I end up having double lunch (Ain’t complaining! lol). Anyway, long story short, mama bear is a salad fanatic and her favorite is crab meat salad. She made me eat this one day and now I love it, so here it goes.

What you’ll need:

  • Lettuce of your choice, clean and torn (mama bear says that the greener the lettuce the healthier it is, so I used Cuban lettuce. Don’t ask. lol.)
  • Tomatoes, slice ’em and dice ’em
  • Onions, finely chopped (I added this just because I got creative)
  • Crab meat, shredded (she uses TRANSOCEAN CRAB SUPREME)
  • Salt & Pepper to taste
  • Oil & Vinegar to taste

Mama bear also adds random things every now and then… like blueberries. But like I said : LOL, Hot mess ❤

Directions:

  1. Prep the lettuce on a dish.  
  2. Toss in the tomatoes & the onions.
  3. Season with salt & pepper.
  4. Decorate with the crab meat. On the top, to the side, make a happy face… whatever makes you happy.
  5. Sprinkle oil and vinegar, to taste.
  6. Dance in circles with your hands up as you enjoy the taste. (that’s what she does… not even kidding lol)  😀

That simple and so delicious. Enjoy !